

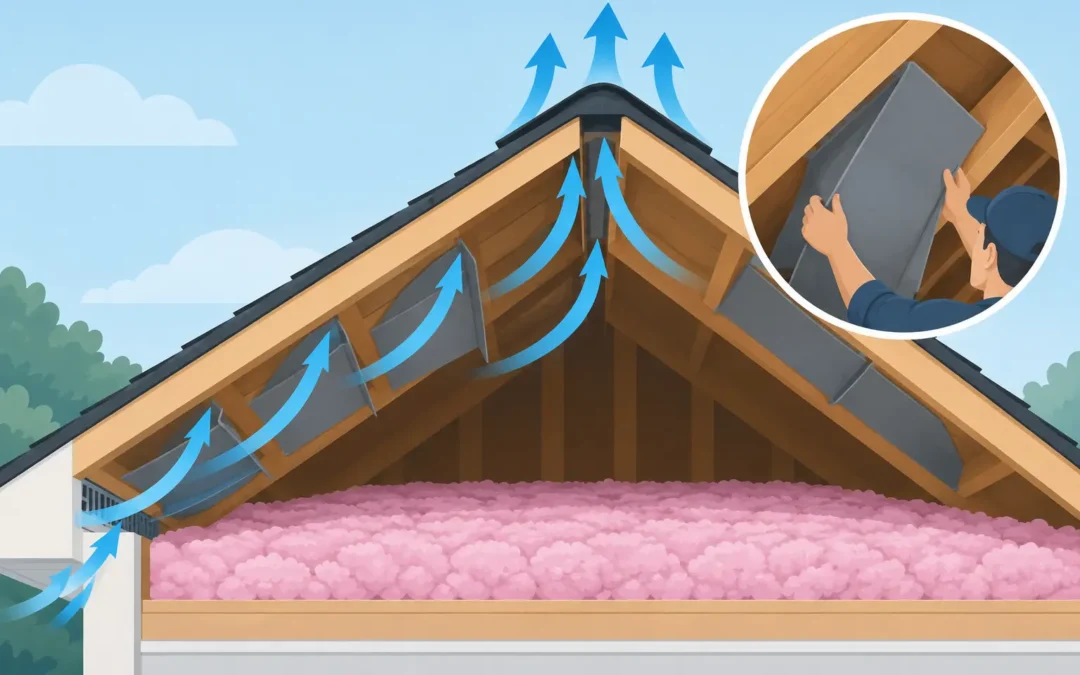
A hot upstairs room, rising cooling costs, or insulation packed tightly against the roof edge can point to a problem most homeowners never see: blocked soffit ventilation. This attic baffle installation guide explains how baffles protect the open air channel between your soffit vents and attic space, while keeping loose-fill or batt insulation where it belongs. For Southern California homes that face intense sun and long cooling seasons, that small detail can make a meaningful difference in attic heat, moisture control, and roof-system health.
What Attic Baffles Do
Attic baffles, sometimes called rafter vents or insulation chutes, are lightweight channels installed in the rafter bays above exterior walls. They create a protected passage for outdoor air entering through soffit vents. That air can then move through the attic and exit through properly designed ridge, roof, or gable ventilation.
Without a baffle, insulation can slide, drift, or be installed directly over the soffit area. The result is an obstructed intake vent. Your attic may retain more heat, and any moisture that reaches the space has less opportunity to escape. In a home with air leaks from bathrooms, kitchens, recessed lights, or duct penetrations, that reduced airflow can contribute to condensation and material deterioration.
Baffles are not insulation. They do not lower energy costs on their own, and they do not solve a roof leak, rodent infestation, mold problem, or failed exhaust vent. Their job is specific but important: preserve ventilation at the eaves while allowing enough insulation to be installed at the attic perimeter.
When an Attic Needs Baffles
Baffles are commonly needed in vented attics with soffit vents and insulation at the ceiling plane. If you can see insulation stuffed into the roof edge or notice that the soffit vents have no clear path into the attic, baffles should be considered.
They are especially useful when adding blown-in insulation. Loose-fill material can easily cover soffit openings unless each rafter bay is protected first. Homes with shallow roof pitches are another common concern because there is very little working space near the exterior wall. This is where installers may be tempted to compress insulation or leave the edge under-insulated, neither of which is a good long-term answer.
A professional inspection should come before installation when the attic has water staining, rusted roof nails, mold-like growth, animal droppings, damaged ducts, disconnected bath fans, or contaminated insulation. Covering those conditions with new materials can hide the evidence while leaving the source unresolved. The Attic Insulation Specialists Inc. treats ventilation as part of a complete attic protection system, including air sealing, insulation condition, pest activity, moisture, and exhaust routing.
Choose the Right Baffle Material
Most residential baffles are made from foam, molded plastic, or corrugated cardboard. Foam and plastic products generally hold their shape better in humid conditions and during installation. Cardboard baffles can work well when they are installed carefully in a dry, clean attic, but they should not be used to cover active moisture damage.
The correct size depends on rafter spacing and the depth of insulation planned for the attic floor. Standard rafter bays are often 16 or 24 inches on center, but older homes are not always consistent. Measure several bays rather than assuming every opening is identical.
More insulation is not automatically better if it closes the ventilation path. The baffle must extend far enough down toward the soffit to maintain an open intake channel, then rise high enough above the final insulation level to keep loose-fill material from spilling into that channel. Product instructions and local code requirements should guide the final placement.
How to Install Attic Baffles Safely
Attic work can involve heat exposure, unstable framing, electrical hazards, contaminated insulation, and poor visibility. If your attic has rodent droppings, suspected asbestos-containing material, mold, exposed wiring, or significant roof leaks, stop and arrange a professional evaluation. Do not disturb contaminated insulation without the right containment and protective measures.
For a clean, accessible attic, the installation process follows a practical sequence.
1. Confirm the Ventilation Plan
Start outside. Verify that soffit vents are actually present and have not been painted shut, screened over with debris, or blocked by insulation from inside. Then identify how air is expected to leave the attic. A balanced system needs both intake and exhaust. Adding baffles where there is no functional exhaust path may improve access at the eaves, but it will not create complete attic ventilation.
Avoid treating powered attic fans as an automatic substitute for passive roof ventilation. Depending on the home and installation, a fan can pull conditioned air from living spaces through ceiling leaks, increasing cooling demand. The right approach depends on the roof design, vent layout, duct condition, and air sealing.
2. Clear the Rafter Bays at the Eaves
From inside the attic, carefully pull insulation back from each soffit area. Do not push it into the vent opening. Inspect the roof sheathing and framing as you work. Dark staining, soft wood, visible daylight in the wrong place, or moisture should be documented and addressed before the bays are closed off with baffles and new insulation.
Keep your weight on structural framing or secure attic walk boards, never on the drywall ceiling. One misplaced step can crack the ceiling below or cause a fall.
3. Position Each Baffle Against the Roof Deck
Slide the baffle into the rafter bay so it rests against the underside of the roof sheathing. Its lower end should reach the soffit area and leave a clear path for incoming air. The upper portion should extend above the eventual insulation depth.
Secure it to the sides of the rafter bay with staples or approved fasteners as directed by the manufacturer. Do not crush the channel. A flattened baffle cannot provide the clearance it was installed to protect.
At this stage, look for gaps around the ceiling top plate, wiring penetrations, plumbing stacks, and duct openings. Those gaps allow indoor air to enter the attic. Air sealing often provides better comfort and energy results than simply adding more insulation, but it must be done with materials appropriate for the location and heat exposure.
4. Add an Insulation Stop When Needed
A baffle protects the airflow channel, but loose-fill insulation can still spill into the eave area. Install a rigid insulation dam or blocking at the attic perimeter when needed to hold the insulation back. This is particularly helpful with deep blown-in insulation or very low roof slopes.
The dam should contain insulation without restricting the baffle opening. It should also maintain required clearances around recessed fixtures, flues, chimneys, and other heat-producing components. Never bury equipment or vents that require open clearance.
5. Restore or Install Insulation to the Proper Depth
After the baffles and air-sealing work are complete, insulation can be installed evenly across the attic floor. Avoid compressing batts, and do not cover soffit channels, bath fan terminations, junction boxes that must remain accessible, or service platforms.
The ideal insulation level varies by home, existing materials, climate-zone requirements, and the condition of the ceiling assembly. In Los Angeles, Orange, Ventura, and Riverside County homes, attic performance is often affected by radiant roof heat, leaky ductwork, and inadequate air sealing as much as by insulation depth. A whole-attic assessment can prevent spending money on one upgrade while overlooking the source of the problem.
Common Baffle Installation Mistakes
The most frequent mistake is installing baffles without checking whether soffit vents are open and whether the attic has a real exhaust route. Another is adding insulation over every available surface without protecting recessed lights, exhaust ducts, combustion-related clearances, or attic access hatches.
Improper bathroom fan venting is also common. A bath fan should not discharge moist air into the attic. Baffles can help preserve general ventilation, but they cannot manage a concentrated stream of warm, humid air from a fan duct that ends inside the attic.
Finally, do not use baffles to conceal an attic that needs cleaning or remediation. Rodent-contaminated insulation, mold-affected framing, damaged ductwork, and roof leaks require direct correction before new insulation is installed.
When Professional Installation Makes Sense
A homeowner with a clean, low-risk attic and safe access may be able to install a few baffles correctly. Professional help is the better choice when the attic is tight, heavily insulated, contaminated, unusually hot, or connected to broader issues such as duct leakage, roof moisture, pests, or poor indoor air quality.
A licensed attic contractor can evaluate the ventilation design, install baffles without blocking intake, air seal the ceiling plane, remove damaged insulation, and restore insulation to a consistent depth. That coordinated approach protects more than energy efficiency. It helps protect the roof structure, the quality of air inside the home, and the value of the property.
A clear ventilation channel at the roof edge is easy to overlook, but it is one of the details that helps an attic work as a system instead of becoming a hidden source of heat, moisture, and avoidable damage.